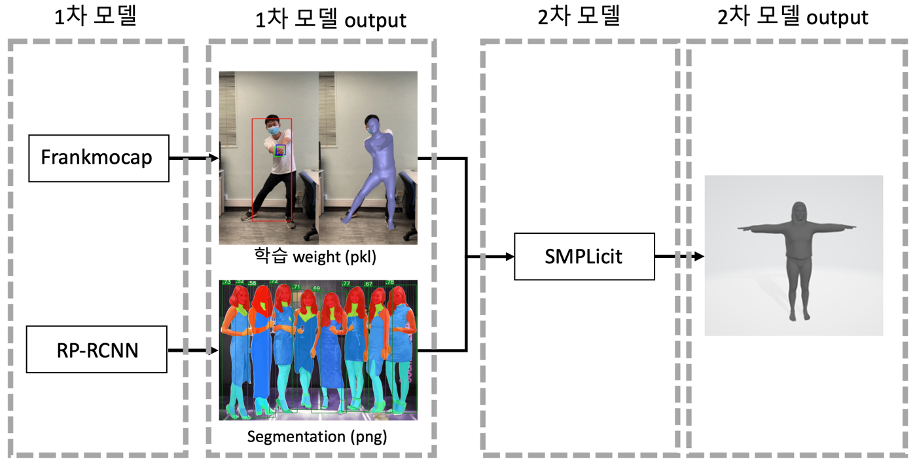
- SMPLicit은 이미지 데이터를 Frankmocap의 모델로 학습하고, 그 결과인 pkl(pickle)파일을 사용하여 3D 모델링이 가능한 Obj(Object file)로 출력해주는 소스입니다. 이는 Body pose와 shape, clothing geometry 표현이 가능합니다.
이는 Body pose와 Body Shape를 표현하기 위해 Frankmocap에서 결과물로 출력되는 weight값인 .pkl 파일과 Clothing Geometry 표현을 위해 R-CNN 모델을 사용하여 나온 결과물인 Segmentation image file을 사용하여 표현됩니다.
< 모델 구조도 >
< 사용 예시 >
1.1 결과 예시
< 1번 이미지 파일의 결과값을 3번 이미지와 같이 obj 파일로 출력>

< Example.py의 결과 Mesh로 출력한 obj. file>
2 개발 과정
2.1 Github
- link : https://github.com/enriccorona/SMPLicit
- License : Non-commercial scientific research purpose
2.2 개발 환경
- OS : Windows
- Conda Environment : python 3.7
- Cuda version : 10.2
- Pytorch Version : 1.9.0
- kaolin version : 0.1.0
2.3 과정
2.3.1 예제 코드 테스트
1) Github clone후 Requirements 설치 (requirements에서 pytorch 최신 버전 깔리도록 해두었으므로, cuda version에 맞는 pytorch 재설치 – uninstall 후 재설치 하거나, requirements에서 변경)
2) setup.py로 요소 설치 및 opencv등 import 오류뜨는 것들은 각각 설치
3) 원개발자가 경로를 하드코딩해둬 path를 불러오지 못하는 이슈가 있으므로, 이에 관해/SMPLicit/clusters/ 디렉토리에서 indexs_clusters_tshirt-smpl.npy 관련 path 설정
4) conda가상 환경에서 python example.py 실행하여 예제 코드 실행
2.3.2 테스트
- 테스트는 fit_SMPLicit의 readme.md에 맞춰서 진행
- fit_SMPLicit.py를 실행하기 위해서 필요한 데이터는 image, cloth_segmentation, Instance Segmentation, prediction(.pkl) 으로 나뉨.
- 위의 데이터를 각각 SMPLicit/fit_SMPLicit/data/ 디렉토리에 넣고 학습을 진행해야함.
2.3.2.1 Segmentation
- RP-RCNN과 Self-Correction-Human-Parcing 중 하나를 사용하여 Cloth와 Instance에 대한
Segmentation 진행.
- RP-RCNN으로 진행해본 결과, 윈도우에서 설치가 되지 않아 Self-Correction-Human-
Parcing을 사용하여 진행할 예정.
2.3.2.2 FrankMocap
- Frankmocap을 사용하여 pkl. File을 output으로 받아옴.
2.3.2.3 Fit_SMPLicit.py 실행
- fit_SMPLicit 디렉토리 내 경로에서 python fit_SMPLicit.py 실행
'딥러닝 > Virtual Production' 카테고리의 다른 글
| [Nerf] 사진 데이터를 수집하여 공간 영상을 만들어보자. (0) | 2021.10.29 |
|---|---|
| [NeX] 3. NeX코드 데이터셋을 만들어서 돌려보자. - LLFF로 필요한 것들 추출 (1) | 2021.09.15 |
| [NeX] 2. NeX코드 데이터셋을 만들어서 돌려보자. - Colmap 설치 (0) | 2021.09.15 |
| [NeX] 1. NeX코드 설명/설치 (0) | 2021.09.15 |